안드로이드 스튜디오에서
텍스트 상자(TextView)의 가로정렬과 세로 정렬을 할 때 쓰이는 게
horizontal(수평=가로)과 vertical(수직=세로)이다.
오늘은 horizontal과 vertical에 대해 알아보고자 한다.
세로정렬 - vertical
vertical은 '수직'이란 뜻이 있다.
수직은 위에서 아래로를 뜻한다.
위에서 아래로는 세로를 뜻한다.
android:orientation = "vertical"
위에처럼 적으면 '세로'로 정렬이 된다.
orientation이란 단어가 보이는데
이 orientation은
레이아웃(배경=흰 색 도화지) 안에 배치할
위젯(버튼, 텍스트)이
수직(vertical) 또는 수평(horizontal) 방향을 설정할 때 사용한다
즉 vertical이나 horizontal 사용할 일이 생기면
orientation이란 레이아웃 속성 중 하나를 사용하는 거다.
orientation과 vertical 그리고 horizontal이 서로 그림자처럼 따라다니는
관계라고 생각하면 된다.
이제 아래에 조금 긴 코드가 갑자기 나올텐데
그 코드를 다 볼 필요도, 이해할 필요도 없다.
내가 위에 작성했던
android:orientation = "vertical" 만 찾아서 보면 된다.
중요!!!!!!!!!!!!!!!!! 표시를 해놔서 바로 눈에 보일 것이다.
<?xml version="1.0" encoding="utf-8"?> <LinearLayout xmlns:android="http://schemas.android.com/apk/res/android" xmlns:app="http://schemas.android.com/apk/res-auto" xmlns:tools="http://schemas.android.com/tools" android:layout_width="match_parent" android:layout_height="match_parent" android:orientation="vertical" // 중요!!!!!!!!!!!!!!!!!!!!!!!!!!!!!!!!!!!!!!! tools:context=".MainActivity"> <TextView android:layout_width="wrap_content" android:layout_height="wrap_content" android:text="가로 텍스트 1입니다. 텍스트가 왼쪽에서 오른쪽으로 쭉 갑니다." app:layout_constraintBottom_toBottomOf="parent" app:layout_constraintEnd_toEndOf="parent" app:layout_constraintStart_toStartOf="parent" app:layout_constraintTop_toTopOf="parent" /> <TextView android:layout_width="wrap_content" android:layout_height="wrap_content" android:text="가로 텍스트 2입니다." app:layout_constraintBottom_toBottomOf="parent" app:layout_constraintEnd_toEndOf="parent" app:layout_constraintStart_toStartOf="parent" app:layout_constraintTop_toTopOf="parent" /> <TextView android:layout_width="wrap_content" android:layout_height="wrap_content" android:text="가로 텍스트 3입니다." app:layout_constraintBottom_toBottomOf="parent" app:layout_constraintEnd_toEndOf="parent" app:layout_constraintStart_toStartOf="parent" app:layout_constraintTop_toTopOf="parent" /> <TextView android:layout_width="wrap_content" android:layout_height="wrap_content" android:text="가로 텍스트 4입니다." app:layout_constraintBottom_toBottomOf="parent" app:layout_constraintEnd_toEndOf="parent" app:layout_constraintStart_toStartOf="parent" app:layout_constraintTop_toTopOf="parent" /> </LinearLayout>
위의 코드에 TextView란 단어가 보일 것이다.
모르시는 분들이 있을까봐 간단히 설명하고 넘어가자면
우리가 ppt 만들 때 글씨를 삽입할 때 텍스트 상자를 생성하고,
그 상자 안에 텍스트를 작성한다.
마찬가지로 안드로이드 스튜디오의 xml파일에서 글씨를 작성할 땐
TextView란 걸 작성하면 글씨를 넣을 수 있는 텍스트 상자가 만들어진다.
본론으로 돌아와서
xml 파일의 맨 위에 있는 리니어 레이아웃(LinearLayout)안에
android:orientation = "vertical" 를 작성한 걸 볼 수 있다.

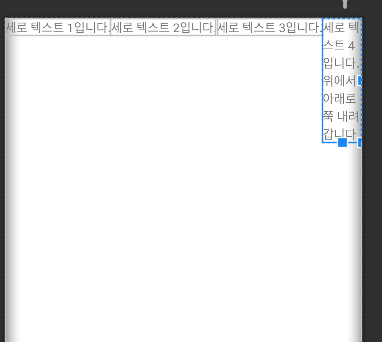
위에처럼 코드를 작성하면 위의 사진과 같이 뜬다.
vertical을 이용하니
텍스트 정렬이 세로(위에서 아래)로
된 걸 확인할 수 있다.
위의 이미지를 보면 '가로 텍스트 1입니다. 텍스트가 왼쪽에서 오른쪽으로 쭉 갑니다.'
이렇게 작성되어 있는데 오타다.
'세로 텍스트 1입니다, 위에서 아래로 쭉 갑니다'가 맞다.
가로정렬 - horizontal
horizontal은 수평선이란 뜻이있다.
바다를 보면서 수평선이 참 예쁘다고 하지 앟는가.
수평선은 가로다.
왼쪽에서 오른쪽(혹은 그 반대)으로 쭉 가는 거다.
가로 정렬을 하려면 vertical에서 horizontal로 바꿔서 작성하면 된다.
android:orientation = "horizontal"
코드는 위에랑 거의 똑같아서 생략하고
바로 사진을 봐보도록 하자.
텍스트 상자를 horizontal(가로)로 해주니
왼쪽부터 오른쪽으로 텍스트가 가로로 정렬되는 걸 확인할 수 있다.
'IT > Android studio' 카테고리의 다른 글
| [Android] setText가 뭘까? (0) | 2022.08.21 |
|---|---|
| [Android] wrap content와 match parent의 차이 (0) | 2022.08.21 |
| [JAVA] '(파일이름)'을 찾거나 로드할 수 없습니다. 해결방법 (0) | 2022.08.16 |
| [JAVA] 자바 주석처리 단축키 (0) | 2022.08.14 |
| [JAVA] 이클립스 주석 글자 색 변경 방법 (0) | 2022.08.05 |